Microsoft Office Outlook 2010 With BPOS Goodness
So you are setup with a FREE trial of Microsoft’s Business Productivity Online Suite and are enjoying all the online apps but something is missing, you don’t want to use web apps, you want to use all the features of Microsoft Office Outlook 2007 or 2010 that you have already paid for and know your way around.
Well it is possible to have your cake and eat it too! *IF* you signed up for the BPOS Standard trial instead of the “Deskless Worker” trial, then you can configure your Outlook to view the same Exchange data you see with Outlook Web Access. You will see the same emails, the same contacts, the same tasks, folders, public folders, calendars etc!
Wait, you didn’t get the Standard version of the BPOS demo? That’s okay, you can log back into the portal and activate the Standard version, then deactivate the Deskless Worker product and not even lose your configuration. YOU MAY lose your emails though and have to start over, but hey, it’s just a demo, you didn’t have that much anyway!
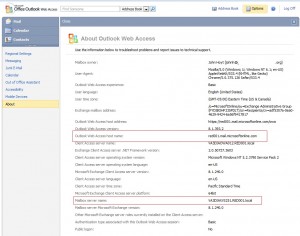
Okay, so back to task at hand, getting Outlook configured. It’s EASY, relatively speaking to accomplish this. First you log into your online mail app (OWA) at http://mail.microsoft.com and once in there, click on OPTIONS at the upper right hand corner, then, select ABOUT from the left hand menu. You will see something that looks like this:
The important information for you to gather will be the “Outlook Web Access host name”, and the “Mailbox server name”.
Now, close out Outlook on your desktop and go to START/Control Panel and select Mail (If using Win 7 64 bit, once you open Control Panel, type “mail” in the Search Control Panel input at the top right hand side and select “Mail (32-Bit)”).
Select “Show Profiles” and add a new one… Let’s call it “BPOS”. Next, select the checkbox for “Manually configure server settings or additional server types” then hit “Next >”. Select “Microsoft Exchange or compatible service” and hit “Next >”.
In the “Server:” field, put the information you gathered from Outlook Web Access for the Mailbox Server Name… (Ex: A3DIAXVS251.RED001.local). For “User Name:” enter your email address, then select “More Settings”. Don’t bother hitting “Check Name” as it will not function (yet)…
Select the “Connection” tab, at the bottom, select “Connect to Microsoft Exchange using HTTP” and then hit the button “Exchange Proxy Settings…”, for “Use this URL to connect to my proxy server for Exchange:”, you need to enter the Outlook Web Access hostname from OWA (Ex: red001.mail.microsoftonline.com) and do not include the “https://” or the “/owa” here, just the hostname.
You can select to “Only connect to proxy servers that have this principal name in their certificate” if you wish, but not necessary.
DO select both of the checkboxes at the bottom for “On xxxx networks, connect using HTTP first, then connect using TCP/IP”, and set the proxy authentication settings to “NTLM Authentication”.
Click OKAY and apply those settings and now try to open Outlook… You should be prompted with a login.
Sounds complicated? Kinda-sorta, but it works well, and you only have to do it once. You can also use the Microsoft single signon client if you wish, which will remember your login and password and allow you to open Outlook without any issue, but some company policies may not allow you to install additional software, or automatic login applications so the above should work for you.
If you get stuck, please reply here or shoot me an email at info@homelandsecureit.com and I will try to give you a hand.

